We've been here over a week now and there's every prospect we'll be here for another week. St Martin was our chosen island from which to depart the Carribbean for Bermuda (although it is possible we may visit Anguilla (only 5 miles away) and Culabra, one of Puerto Rico's Spanish Virgin Islands lying to her East, before we finally depart).
We're here now (end of April), because June is the start of the Hurricane season and the north west Carribbean lies on the arc that most hurricanes travel as they develop in the mid Atlantic before sweeping south west as early stage tropical depressions, through west, north west and eventually north east as fully fledged hurricanes; when they typically ravage the northern Carribbean islands, Cuba, the florida coast and the Bahamas, before, usually, disappating.
So we want to be out of here before the first hurricane arrives. But we also want to avoid the northerly gales that have a habit of sweeping down the North American Atlantic seaboard in the winter and spring. The later we leave, the less chance of encountering one of those, but the greater the chance of an early season hurricane! That's why I decided to buy Starlink - we'll now be able to track the weather systems in real time and take avoiding action if necessary.
We chose Saint Martin because it has well stocked Chanderlries for boat stuff and extensive marine services and is therefore a good place to prepare the boat for the ocean passage to Bermuda, about 800 miles to the north - roughly half way to our destination, Nova Scotia.
On arrival here, we added two big jobs to our jobs list, which, until then, mainly comprised routine maintenance and checks. The two additions being to repair one of the burners on the gas stove, which had finally become unusable due to corrosion and to try and cure a major condensation problem around the fridge box I made and installed a couple of years ago.
Today (Tuesday 30th April) feels like the week or so just gone, has been full on tackling these two disrupters to easy living.
Bonny's gas cooker is an old Plastimo, a brand apparently reknown for its propensity to disintegrate in tropical climates. It's lived up to that reputation (I really need to replace it but can't afford to). Indeed, the warning signs were apparent way back in the Canaries, when one of the burners became increasingly difficult to light. I managed to dismantle it then and removed lots of debris that was preventing air getting in. That lasted for a few months but it deteriorated again until finally a few weeks ago it became unusable. So we took it appart again....

The lip on the burner cap had now corroded so much that too much air was getting in which made flame very unstable.

All we needed was a replacement burner cap, but none of the 3 large chanderlries on the island stocked the type required. Another type was available but that would require fitting a new flame spreader too. They, off course were designed to fit a different shape cooker base plate, one with a void under the burner spreader....
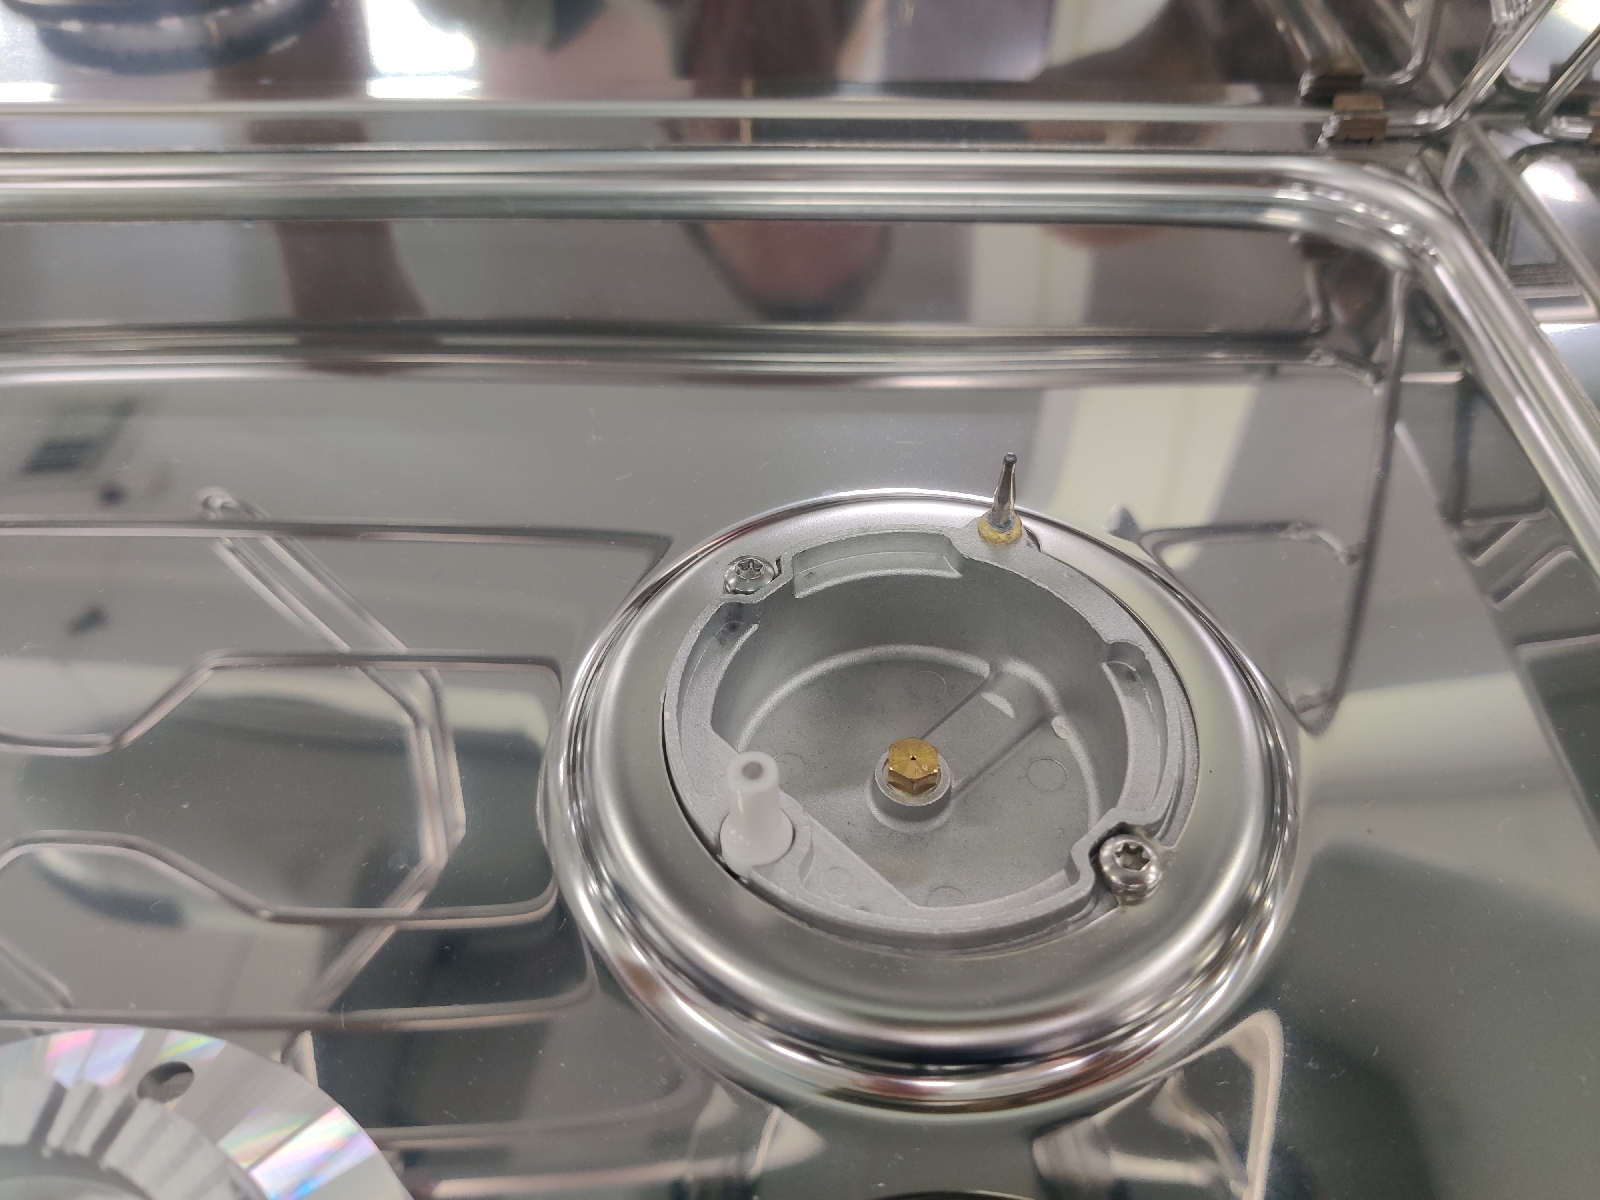


However, we had little choice but to try and make it work. Some $40US later we had the bits we needed.
Next step, remove the old burner spreader. Unfortunately my repair back in the Canaries meant I had to butcher the old spreader to get it off before we could replace it with the new one and its burner cap.
Initial trials were not encouraging. Instead of a nice blue flame we had a smokey yellow one. At this point we realised that with no void under the new burner spreader, which, unlike the old one, sat directly on the base plate rather than being raised above it, hardly any air was getting in. Perhaps we could cut away some of the bottom part of the burner spreader to allow air in?

We also needed a means of securing the burner spreader to the base and we needed a base that was wider than the existing one. Fortunately we had the tap set bought in Mindelo and were able to drill and tap a hole in the base and then bolt the burner spreader to it. I also managed to enlarge the base with an old tin end that I had previously used in a vain attempt to make a replacement burner top (thats why it looks so crappy). Eventually this will need to be replaced with a more robust piece of metal....

Hey presto - it worked...
Next up, the fridge - although in reality we tackled these two jobs in parallel.
We were first alerted to there being a problem when we noticed that even after we had fixed all the pipe leaks following the installation of the new water pump, water was still collecting at the bottom of the locker under the sink. Then I noticed that the bulkhead on the forward side of locker was saturated. Fortunately, when I installed the new fridge and it's compressor I had drilled a hole through thies bulkhead in an attempt to provide more ventilation to the compressor and I was able to see the saturated plywood and by inserting my fingers through it, could tell the water source was from above - from the fridge box.
There was nothing for it but to dismantle the new front panelling in front of the fridge box ...

and look for the source of the water. This also involved dismantling the new galley work top I had built in the Canaries and removing the bilge pump.

Once done and the front panel removed it was clear what the problem was; condensation. It was forming on the outside of the plywood fridge box and running down the sides, collecting on the base and then running down the bulkhead.
Why? As Mick explained patiently, because I had not bonded the insulation to the box. Water vapour in the air gap was therefore able to condense into liquid water on the cold surface and dribble down the sides of the box!
Bugger! To fix this I would have to: remove the cold plate and disconnect the gas tupes between the compressor and rhe box; remove the fridge box and existing insulation; cut away the joinery around the front of the box so that it (the box) could then be slid in to the gap with the insulation attached; bond the insulation to the box, replace the box, reinstall the cold plate and gas tupes and replace the top insulation and lid. Previously, I had simply inserted the insulation boards in place underneath and around the sides and then pushed the box in between the insulation boards.
I knew I would have to cut out the top insulation that was glued in, whereas that around the bottom and sides was not and could be re-used. So, the first job was to buy some more insulation and glue. That took the best part of a day.
Then I had to remove the cold plate and delicate pipework. Then remove the box and insulation boards. Then cut away the surrounding joinery. Thankfully a new pal, David, a solo sailor from Canada, lent me his multi tool, this made this a much easier job than it would otherwise have been.
The front panel I had made when I undertook the original installation, wasn't wide enough to cover the full width of the box plus insulation boards glued to both sides. This meant that the insulation on one side of the box could not be glued on before inserting the box. The glueing operation took a couple of days because of the need for the glue to set before manhandling the box back into place. Our portable fridge/freezer box and the cover panel came in handy as a weight to press the insulation boards onto to the sides of the fridge box..

Next step was to slide the box back into its slot having first inserted a sheet of insulation board on the left behind the surrounding woodwork. That board I secured in place by the very primitive means of jamming a thinner sheet of insulation board alongside it.
Once that was all done I stood back to admire my handiwork. Hmmm, something was not quite right. Dam and dam again. The whole thing stuck out an inch further than before which meant there was not enough space in which to fit the front insulation board. This was a disaster. The objective of the whole operation was to improve the insulation not reduce it. The box was now jammed in so tightly that I was sure any attempt to remove it would rip the insulation boards off the bottom and right hand side of the box and would necessitate the destruction of the insulation boards I had just jammed in so tightly?
What to do? Then it occurred to me. Simply line the inside of the front of the box with insulation board. Sure it would make the box a little smaller but that was a small price to pay. Also, I could cut the existing board in half to reduce its thickness and stick half of it on the front of the box before covering it up with the front panel.
The fiddliest job was insulating the top of the box around the lid. Achieved by crudely stuffing in bits of board into the various voids and bond them in with gunk. Then I covered the whole area with aluminium tape ...


The fridge is now back in operation and so far there doesn't seem to be a problem with condensation.
On the social front. We discovered on our second full day, that Rob, whom we had first come across in Porto Santo and then again in Bequia, was still here. We had set out in our dinghy to visit the Dutch side of the island via the Lagoon and came across Rob. Of course we had to stop to say hi. A few beers and Rums later he suggested we go and visit his pal Ian. That was the end of our planned visit to the Dutch side. Goodness knows how many rums later, we returned to Bonny to recover.
On our first day, indeed at check-in, we bumped into a friendly Canadian. A couple of days later when we managed to sneak past Rob and Ian without being spotted we bumped into David again in onevof the Chandeliers on the Dutch side. He had bussed it down the island in search of a new outboard motor to replace his deceased one and was delighted to be offered a lift back. Of course we went
aboard his lovely Choye Lee 36 footer and helped him consume his stock of Gin! That cemented a firm friendship and we have spent time together on most days since.
Then the day before yesterday, our lovely Swedish friends Jan and Elli on board Titti4 arrived. They too are heading for Nova Scotia and so we will hopefully make the trip together.
At the moment it looks like a suitable weather window may open up next week for the trip to Bermuda.


Like they say: mending your boat in exotic places.
ReplyDeleteFair winds for the next leg